So you've just finished making your character exactly how you want him/her and you're past the (very fast) loading screen. One of the first things you'll do is open your character pane, to get acquainted with the stats you'll be using. Oh lucky day! the stats I need are highlighted for me! That's nice of Astrum Nival to- wait. what does all this mean?
The most important stats to your priest as a healer (and when soloing) are:
Faith | Intelligence | Luck | Wisdom | Perception
Faith - Your heals will ignore n% of target's wound complexity.
To make this stat more clear, we need to know what exactly wound complexity is. When fighting a monster of any kind in the world of Saurnat, you'll notice that as you're being hit you're gaining what looks like little slash marks on the left hand side of your health bar. Scrolling over these marks you'll see a number, something like: 65% Wound Complexity. What this does is lower the healing received on you. The more wound complexity you or your target has, the less your heals will effect them.
This is where Faith comes in handy. Faith is the priest's counter to the oh so evil wound complexity. As you increase your Faith you'll start ignoring this wound complexity and, when maxed, you ignore 100% of it. So you can see how important this stat is to a healer. I would tell you to max this stat out, but it's hard to do right now since the tooltip is bugged and will always tell you it's at 0%. The best thing I've found to do is get it when I can, but don't lean too much one way in stats. I'll talk about this later.
Intelligence - Increases your magical damage and healing by n%
This stat is very straight forward. The more you have, the more damage and healing you will be dishing out for every skill. if you open your talent page (N) and mouse-over any skill that deals damage or heals you will see it increase with your intelligence. Unlike Faith Intelligence has no cap, but don't go hog wild just yet; make sure your Faith is maxed out or close before you start really stacking the intelligence. What good is all that healing if wound complexity nullifies most of it? There is also another stat that can increase or kill your healing:
Luck - Your chance to critical strike is n% / Your chance to glancing blow is n%
Before Luck can be understood fully, we need to know what a glancing blow is. While trying to kill the infamous Rabid Squirrel did your tank die because your last cast heal only healed him for about half of what it was suppose to? You look at your Faith and your chock full of it. You've been adding to your intelligence also and are really displeased with this erratic healing. Well, these "half heals" are glancing blows and they happen because you may have low Luck. If you're not putting stats into this one you'll have a very low crit chance and a fairly high chance to send out half, or less, heals.
Now that we understand glancing blows, Luck is very simple. If you want more crits and less "anti-crits" start giving Luck some attention.
Wisdom - Increases your mana pool to n% and your mana regeneration rate to n%
Wisdom is sort of a hard stat to come by if you're looking mainly for int/faith gear. It never seems to be on anything along with those two stats. But it's going to be very important in a long, healing intensive fight. Wisdom, as stated before, increases your mana pool allowing you more heals. It also increases the rate at which your mana replenishes at a pretty substantial rate. Mana regen is NOT halved or decreased in battle, so the number you see is the number you always get. Be aware of this stat because it will be very important in the long run.
Perception - Decreases your target's chance to resist your spells by n%
Apparently heals can now be resisted as a result to low perception. I haven't done any testing on this, nor have I seen it happen personally. I will however trust in the community that this is correct. When questing, the last thing you want to see is resists and wasted mana. This stat will make you hit your enemy almost every time. There is no real need as of yet to be overly conscious of this stat, if you are adding Faith to yourself you should be picking this up along with it anyway. Faith and Perception are usually shared on the same piece of gear.
It is ideal to keep all of these stats pretty even with each other, but you may find this is a hard task with the levels we're given in the closed betas.
If you lean to heavily on Faith and Intelligence, you will have very high heals that many times will be halved. If you lean to heavily on Luck you will have consistently low to sub par heals. Do your best to even these stats out.
Gear Choice
Priests gear restrictions are one of the least strict in Allods: from level 1-9 cloth | 10-29 leather | 30+ plate
That's right, we get plate at 30!
All of the above mentioned stats (besides maybe wisdom) are very important to your Priest's success. It is ultimately your choice what gear you wear while leveling so I'll leave it as your choice.
Some tips, however: a faith/preception/intelligence combo is what I used and it seemed to work very well. I've also heard from a Luck priest who said he had no problems leveling either. So it really is your decision.
As far as what type of armor to wear, when you hit level 10, I highly recommend wearing as much Leather as you can. Unless you find a piece of cloth that your leather piece can't compete with. I say this because many monsters in Saurnat deal a hefty amount of damage and sometimes even the Leather on your back can't save you.
Race Specific Abilities
Allods gives us 4 races that are able to play the Healer Archetype, these are Xadaganian, Arisen, Kanian, and Elves. Each of these Races are given their own unique spell:
Xadaganian Inquisitor - For the Motherland - Immunizes the caster and their party from all movement and any control attempt.
Arisen Heretic - Warped Faith - Increases the Faith of the caster by 30% for 30 seconds.
Kanian Cleric - Tensess' Shield - A shield that absorbs damage
Elf Priest - Priest's Revenge - Burns some of the enemy's mana or energy.
Talents
1. Punishment.
Range - 40.
Mana consumption - 26.
Cast time - 2 seconds.
Cooldown - instant.
May be precharged.
A spell that inflicts 9.7 points of Light damage.
2. Verdict.
Range - melee.
Mana consumption - 24.
Cast time - instant.
Cooldown - 2 seconds.
A powerfull attack with melee weapon that inflicts 3.2 points of damage.
Intelligence is used instead of Strength, Intuition instead of Agility.
There is a chance to enter a fanaticism state, to shorten the cast time spells.
3. Purifying Flame.
Range - 40.
Mana consumption - 26.
Cast time - instant.
Cooldown - instant.
Inflicts 4.8 points of light damage. Enemy inflames and take 2.4 points of damage every 2 seconds for 14 seconds.
4. Equanimity.
Range - .
Mana consumption - 16.
Cast time - instant.
Cooldown - 15 seconds.
Priest appeals to the light and becomes immune to spells, increasing the cast time of the next spells.
If subsiquent spell inflict damage or restore health, it`s effectiveness will be encreased by 15%.
5. Healing Light.
Range - 30.
Mana consumption - 32.
Cast time - 2.5 seconds.
Cooldown - instant.
May be precharged.
Restores 38.7 points of health. If the Priest is in combat when casting this spell, he will enter Fanaticism state, reducing cast time of his spells.
6. Dazzle.
Range - 30.
Mana consumption - 79.
Cast time - 2 seconds.
Cooldown - 180 seconds.
May be precharged.
Bright flash of light that blinds an enemy for 5 seconds.
7. Discharge.
Range - 40.
Radius - 8.
Mana consumption - 89.
Cast time - 4.5 seconds.
Cooldown - instant.
May be precharged.
Inflicts 27.2 points of Light damage, knocking down all enemies in 8 meters around the target.
8. Holiness Shield.
Range - .
Mana consumption - 60.
Cast time - instant.
Cooldown - 600 seconds.
Apeal to the Light, surrounding the Priest with a Holiness Shield that makes invulnerable for 4 seconds.
9. Liturgy.
Range - .
Mana consumption - .
Cast time - 20 seconds.
Cooldown - 90 seconds.
A long holy ritual, after which a Priest would restore all his mana. If used out of the combat, it will additionally restore health of all party members.
During combat Liturgy would last 2 times longer.
10. Blessing.
Range - 30.
Mana consumption - 13.
Cast time - instant.
Cooldown - instant.
Restores 9.7 points of health every 2 seconds for 14 seconds.
11. Resurrection.
Range - 40.
Mana consumption - 296.
Cast time - 15 seconds.
Cooldown - instant.
Resurrects a fallen ally. Can`t be used during combat. Resurrected ally have 10% of his health and 0% of his mana/energy.
12. Saint Anger.
Range - melee.
Radius - 5.
Mana consumption - 35.
Cast time - instant.
Cooldown - 2 seconds.
A powerfull blow that inflicts 3.5 points of damage to the target and equal damage to the additional enemy in near the target.
Uses Intelligence istead of Strength, Spirit instead of Accuracy, Intuition instead of Agility.
Skill may be used only when in fanaticism state. On succesfull atack using that skill, the Pries will enter the Rage state, increasing Saint Anger damage by 10% and it`s mana cost by 20%.
13. Healing.
Range - 30.
Mana consumption - 74.
Cast time - instant.
Cooldown - 50 seconds.
Restores 77.4 points of health.
14. Purification.
Range - 30.
Mana consumption - 40.
Cast time - 2 seconds.
Cooldown - instant.
May be precharged.
Neutralizes negative effects such as poison, illness, etc.
15. Great Healing.
Range - 30.
Mana consumption - 79.
Cast time - 6 seconds.
Cooldown - instant.
May be precharged.
Restores 115.8 point of health.
16. Petrification.
Range - 20.
Mana consumption - 40.
Cast time - 3 seconds.
Cooldown - 120 seconds.
May be precharged.
Petrifies an enemy for 15 seconds. May be used only on humanoid target.
Talent Grid
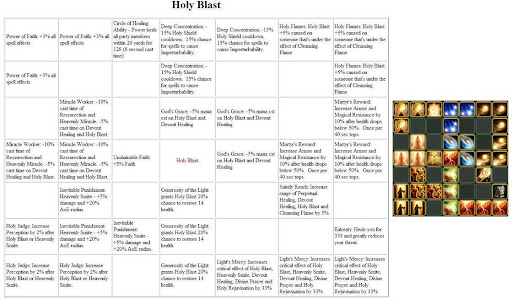
After reaching level 10, three talent grids will be made available to your character. As you will see there are many opportunities to make your Priest Unique from all others, but first thing's first; you have to know how to purchase these talents. Every level after 10 you will need to hop down to your local class trainer and purchase a ruby from him. The price of Rubies increases every level so you'll end up spending a pretty penny for them, but this is well worth the cost!
http://novogradtimes.com/2009/12/05/ruby-pricing/ Here you can find a price table for Rubies.
With the help of chadwich001 I've made a simple image for each of the Priest's talent grids. The Tables given by chad correspond with the talent grid next to them. When I get my computer back I'll probably make these into image maps for easier reference. ;)
Holy Blast Grid
Fanaticism Grid

Cleansing Flame Grid

No comments:
Post a Comment